Online Jewelry Training Classes for Metalsmiths

Map jewelry in it's various commutations are extremely popular all over the world.
Back in South Africa, a local jewellery group started it by making maps of the African continent. These had extra little cut-outs in the actual map, of bushmen, and various species of game found in Africa.
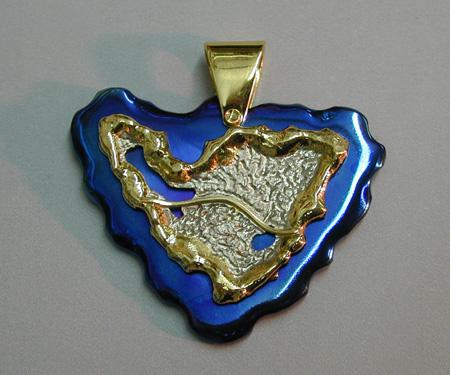
I applied the same principle to design a St. Maarten Map Pendant which reflected the feel and symbolism of the Caribbean island. The blue titanium brought in an element of water with rough fused gold edges as the rocky hills.
This free jewelry tutorial follows the same format as in the premium pdf jewelry tutorials. This gives you a good insight into the to technical teaching methodololy.

I make a lot of St Maarten maps of all sizes and manners, so I have a few sheets of different sizes copied. This one is about 25mm. I simply draw a large 'master' and then reduce them on a copy machine to whatever size I want.

I glue it onto a plate of white gold with a clear contact adhesive

And then I cut on the white gold with a mould cutting scalpel, into the gold. This gives me an indelible line when I fuse the white gold.

This is not the actual bending of the above piece, but I wanted to show how the composite was made into a circle. A ring triblet, a vice and some serious power.

This picture gives the idea for the flame that you need to fuse/melt the 18k white gold. I use a solution on 77% fine gold, 15% palladium and 8% fine silver. It is a nice white gold and fuses well.

This is the 18k gold with the edge fused towards the scribed line. I like fusing to be more rough. The light in the photograph is a bit yellow, but the mixture fuses nicely.

Then I fuse over the white gold with 18k yellow gold, using a piece of wire much like a brazing rod. Care has to be taken not to use to much heat, otherwise the yellow gold floods the white gold to much. A little bit like what happened in the top left hand corner. Luckily I will be piercing it out there. I make yellow gold wire that has about the same thickness as the piece that I am fusing.

Then I cut out Simpson bay lagoon and salt pond like on the map. Apart from the geographical aspect, the blued titanium shows through the cut out spaces and insinuates water.

For measurement the 18k white gold map is placed on the titanium. This is a typical piece of titanium that I will cut my background out of.

I use a thick marker to outline the map and then pierce it out. That is a real schlep job. In this case I am using 2mm thick titanium plate. I use Wd 40 for lubricant. Bees wax works ok and so does a very thin machine oil. In this picture, I have already started filing the background to make it half round.

After I have filed and sanded the background, I position the gold map and drill the rivet holes one by one. This is important. First I drill one hole and insert a rivet. Then I drill the second hole and insert the rivet. Then I drill the third and last hole, as in this case. This sequence must be followed. If you try mark all the hole and then drill them, they will not be aligned.

I melt a small ball on the rear end of the rivet wire and counter sink the hole drilled in titanium with a small ball frazer. So as I hammer on the front of the rivet, the little ball settles into the countersunk back. That makes for a neat joint.

Here I have started polishing the titanium. I use Luxor polish. I do not polish the area that will be covered by the map. Polishing titanium is a mission enough as it is.... The bail is made and I rivet it directly through the titanium. Once the titanium is polished and ultra clean, no dust particles or water stains it gets blued by heating. I check that it is clean by using an Optivisor. I use a soft, bushy, slightly yellow flame. Any dust or dirt left on the titanium during heating will leave a different coloured blue, thus ruining the surface. When this happens is it back to sanding with 1200 grit and then polishing and bluing again.

The white gold surface texture I do by using a small ball frazer, (0.6mm). The gold wire in the middle of the map denotes border of the French side and the Dutch side of the island. The map of St.Maarten is completely finished off before it is riveted on.

I finish the back off with a matt wire brush, or sometimes I sand blast it. The riveting is done last, with great care, because I do not want to mar the surface at all. If I do, that means taking the whole thing apart and starting over from 1200 sandpaper. This I have done before.

The finished St Maarten Map pendant in two different sizes, both handmade following the process following the exact methodology of this tutorial.
Making the St Maarten Map Pendant uses various metalsmithing disciplines like fusing metal, riveting and bluing titanium.
or select other projects from Jewelry Making Tutorials List
If you have any questions or wish to be notified of any new tutorials that are posted, email me.

This content is the intellectual property of Hans Meevis. More information on our Copyright and Privacy Policy