Online Jewelry Training Classes for Metalsmiths


This is a free tutorial on how I make 14k gold screws and a small bearing housing for a spinning ring. I order the bearings from SMB bearings in the UK at http://www.smbbearings.com. For this project I am using a bearing with a 6mm flange and a 5mm diameter and a bore of 2mm. If you go check out SMB's website, they got all the schematics of the various type of bearing available.
These 14k screws and housing were made for the Spinning Ring.
I start with the screw making part first. I use only bench tools, no lathes or milling machines.

I bought a tap and die set from www.riogrande.com. It is quite nice, adequate for the job.
The hassle is that you only get one tap per hole and a replacement tap is costly.

I thread the wire into the 1.2mm hole. The diameter of the wire can be thinner or thicker, but I use 1.2mm because then my pilot hole for the tap is 1mm,( in 18kt gold) and that is a standard drill.
Notice how the wire has twisted. That is because I use the maximum thickness I can for that hole. That way makes sure the threads are fully formed.
If you use to thin wire, it threads easy, but the threads are not fully formed. This will not allow you to tighten the screw adequately, and the thread will tend strip easier.

After there is enough thread, I cut the wire as shown. These are going to be short screws.

Then I take my torch and melt the unthreaded part into a little ball.

This is a close-up of a piece of mild steel plate that I have drilled a hole through, and then used a 2mm ball frazer, ( in this case) to make a domed indentation. The center hole is slightly larger than the diameter of the thread.

The threaded and balled piece of wire is inserted into the steel plate

The little ball is hammered down in to the cavity. This forms the screw head to the desired shape. This shape is rounded, in this case, but is not necessarily the only shape possible.
A barrel frazer or a cone burr will form a flat headed or a tapered screw head shape respectively.
The hammering also work hardens the head, which is essential for screwing something down tightly without harming the screw slot.

Then I file and sand the the top flush with the steel plate.

And I pop it out from the other side.

Then I cut the screw slot , in this case with a 3/0 saw blade, but of course this can be varied to what ever width is needed with a thicker or thinner blade.
Then I re-tap the screw, so as to get the thread as close as possible to the head.

Here is the screw, 2.5mm long, semi finished.
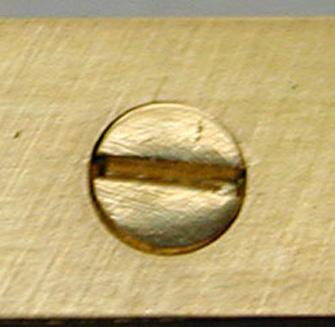
Although the screw is standing proud, it is quite easy to make them flush.
The bearing housing described below is a stand alone one, that is, it is not an integral part of a jewelry piece. Once the ring is designed and made, it will be soldered in place.

The Bearing Housing
These are flanged bearings. I like using them, but of course, any other bearing can be used. It just depends on your design, really.
I use a bore of 2mm as the minimum for a spinning ring.Here are all the three samples set and finished.

I make a tube the same diameter as the flange. The wall thickness is 1mm. Then I drill out a 5mm recess so that the body of the bearing fits inside and the flange rests on top.
I did not have a 5mm barrel frazer, so I modified a 5mm ball frazer, and it worked very nicely. A farmer makes a plan, as they say...

The height of the tube allows me to drill and tap a screw hole without touching it body of the bearing inside. The closer the tolerances, the lower the bearing.

Then I make the outer housing, into which the flange tube will fit. This is simply a tube of the right diameter and a plate soldered on top.

Like this.
This clamps the bearing flange between the outer housing and the flange housing. Then I drill a hole through both sides of the housings, and tap the inner flange housing with a 1.2mm tap. The outer housing hole is enlarged so the thread of the screw can pass easily through.
Again, notice the relatively large bore (center hole) of the bearing in relation to it's overall diameter. This makes for a strong center shaft.

Here the two housings are screwed together. Although the screw looks large in the picture, it is only 2mm in diameter. I leave it proud like this, because this housing is going to be fitted into a tourmaline and diamond cluster, so the screw will be inserted and removed many times. This will wear the head, so I leave enough material to accommodate that.

This is the center screw. Even though the housing is made out of 18k yellow gold, I make the center screw out of 14k gold. This is because 14k is much harder and stronger than 18k gold.
This screw is not made like the small housing screws.
Rather, the top is soldered onto the shaft after it is threaded. I have left the solder visible under the head for the picture.

Here the center shaft is inserted through the bore of the bearing. The center washer stands slightly proud of the outer bearing casing, because when the cluster affair is screwed on, it must not touch the outer casing. If it did, it would not spin easily. It is 7.7mm in diameter.

And 4.5mm high.

All the separate components. Manufacturing time is about 5 hours. Weight of gold, 2.5 grams.
This is certainly not the only way to make a standard bearing housing.
I would love to hear of different methods, should someone know of some.
The screws and bearing housing are used in Making a Spinning Ring.
or select other projects from Jewelry Making Tutorials List
If you have any questions or wish to be notified of any new tutorials that are posted, email me.

This content is the intellectual property of Hans Meevis. More information on our Copyright and Privacy Policy


