Online Jewelry Training Classes for Metalsmiths

This jewelry tutorial will show you the repoussé technique of working the back to form a relief in the metal of these bi-coloured gold rings.
These repoussé rings get their individual completely unique organic texture and shape by using ball punches and chasing tools to stretch and work the metal on the reverse side to create a high dome bold style. A very smooth surface or deep relief texture is up to the individual taste.

This is the basic hard pitch bowl that is used for ‘loose’ repoussé work.
‘Loose’ is explained further on. The bowl is just one of those cast iron cooking pots.

First I roll out a piece of 18ct yellow gold, anything from .75mm to 1.5mm in thickness, depending on whether I want to pave set later or set in tubes etc. Pave would require slightly thicker metal. Pictured are some of the punches I use. I make punches out of 6 inch nails, or as in the picture, a firing pin of a cannon, bottom. Note the firing pin has been softened by annealing the hammering side. This holds true for any automotive or mechanical parts of machinery that are used in a hammering process, for instance like valves to flatten things. And while this is an ‘advanced’ type tutorial, never, never, forget to wear safety glasses.

I draw out a design on the gold directly with a pencil. If this where a complicated design, I would spray a light coat of clear lacquer to stop the pencil being rubbed off. I don’t ‘smelt’ the gold plate onto the pitch as in traditional repoussé in this type of ring. This ‘loose’ method is adapted from repoussé using titanium on a pile of carpet tiles, or a piece of wood. There is no point trying to repoussé titanium in pitch. You have to hit so hard the pitch lets go too soon. When I repoussé titanium, I only use those close-nit workshop carpet tiles and a medium grade wood. And thick punches and a heavy hammer. And safety glasses.

Chase along the pencil lines in a loose manner on the one side I am not to fussed about making a smooth punch line. The little bumps are made with a 4mm ball punch.

And then on the other side. The center part gets forged with a bigger punch, say 6-8mm, over and over, annealing all the time. When I anneal I really like dipping the hot piece in a solution of slightly watered down battery acid. (Sulphuric Acid) But the fumes are vile, and your clothing looks like lace work after a while.
Sodium bisulphate does the job ok.

Beating more and more. If, as in the picture, the piece starts bending in an anticlastic manner, that is, the domed part on the wrong side, annealing and careful hammering brings it back to the opposite or correct round. Repeat…With lots of annealing.

Like this. There comes a time when you decide that ‘now’ is the time to make it completely round.
Then comes the time to cut the edges off. I use a black marker to make it a rough edge and then pierce on the outer edge of the black. This gives me an edge to tap the ring round without touching the 'dome'. I also cut the edges off because it makes it easier to bend the last mile before soldering.

After the ring is soldered closed it is tapped round on the triblet with a ball punch. I work the edge flat with a ball punch on the triblet. I also shape the ‘dome’ to a more balanced shape by tapping inwards and ‘collapsing’ the dome on to the triblet. I like the hammered look and indeed in 18kt the difficulty is not to over polish and make it to smooth….

The white gold inner sleeve is made to the correct size. Don’t forget to stamp the metal before it’s bent round. I use a mix of 77% fine gold, 15.4% Palladium and 7.6% Fine Silver to achieve a very malleable white gold. The join is made to a very fine tolerance, using the least solder for the strongest joint. Most important, that joint. With the bending and flaring over coming later, you don’t want it to start tearing.

The sleeve is fitted into the 18kt ring, the tightest fit possible. Also I make sure the outer surface of the white gold ring and the inside of the repousséd piece are clean and oxide free. Notice the yellow gold is not really finished off. Rather the fundamental principle of making things easier is applied. Namely, if you don’t want a mark on metal, don’t put it there. Generally hard force is less accurate than many medium taps.

A ball punch starts the peening over. From now on I anneal very, very frequently. I like to align the solder joints up so if I have to size it later, it makes it simpler. In this case, simple means soldering white and yellow gold. So the white gold might get soldered first and then the yellow gold. Multi metal sizings are always a little more difficult.
The original white gold band is filed parallel before the peening starts. If you file it to a taper to the shape of the yellow gold and then start peening over, the peening will be unequal and will generally tear at the bottom of the taper.

At this point the white gold has been flared over enough and now I file it to the taper of the yellow gold. The yellow gold band is held tightly by the flaring, but watch out as you file the white gold to a taper. The two tapers can twist out of parallel as you file down, because the center had come loose and twisted sideways. Then you over-file quickly and then you start again.
Now to start flaring the white gold over. Small taps with a polished semi-round hammer on annealed gold is the easiest. I have a small hammer with two different rounds that I ground and mirror finished .I also hit on my flat steel plate slowly bending the white gold lip over and , need I say, annealing all the time...

The edges are bent over on the triblet as well with the hammer profile shown.
I hit from both sides of the triblet, top and bottom. Then I turn the ring around and hit top to bottom again.

Until it becomes tight and flat. Careful hammering can spread the white gold out to a wavy type finish. At this point I anneal and quench in Bi-Carb and water. I only dunk it in acid when it is room temperature. (for the photo) No real reason, since I am going to drill holes in it anyway.

The white gold is planished with the polished hammer and left at that . I have carefully removed the tool marks in the yellow center with rubber wheel, but I left all the bumps from the ball punches.
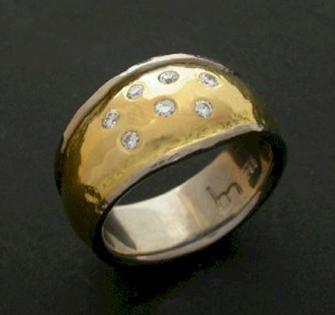
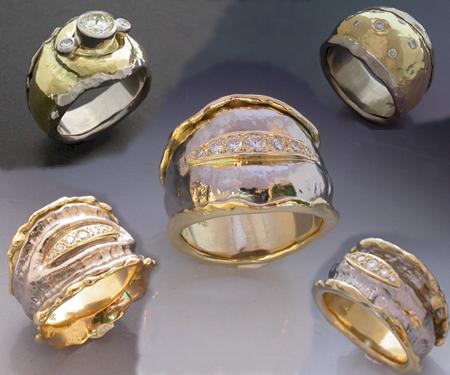
This ring was set in the gypsy style This is only one possibility. I have made tube settings, claw settings, and my favorite, pave, with good success. The various designs can be seen at the end of this tutorial.

This picture shows a different design. Same principle, though.
This time though, I filed the white gold to a taper before I peened it over. The reason is that if the bottom is wide enough, the solder joint won’t tear.

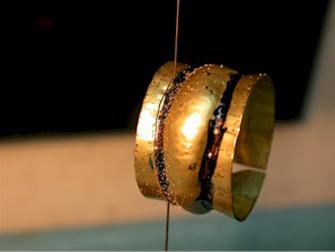
Peening (bending) the white gold over. Note the marks on the wood. It provides a ‘giving’ surface and does not flatten the bottom side.

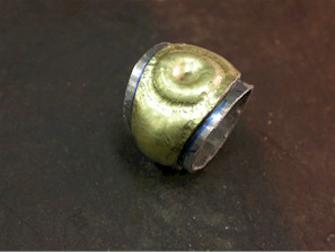
Getting there. Nearly ready to flare it onto the yellow gold

The flaring over is now finished and then is drilled to accept the tube. The picture doesn’t show it, but there is a gap between the yellow and white gold.

The tube is soldered in. White gold solder on the bottom and yellow gold solder on the top. I know the tube looks a bit ‘trumpet-ish’ but after it is set with the appropriate stone, it settles in quite nicely. I used a (17 degree) coning block to make the tube cone shaped. That way I can set the stone to the lowest height with the smallest hole in the ring body. The stone overshadows the tube ‘footprint’, so to speak.

Silver Copper Laminated Ring which is ‘clad’ from the inside so as not to discolour the skin same as making a sleeve explained in this tutorial.
or select other projects from Jewelry Making Tutorials List
If you have any questions or wish to be notified of any new tutorials that are posted, email me.

This content is the intellectual property of Hans Meevis. More information on our Copyright and Privacy Policy