Online Jewelry Training Classes for Metalsmiths

In these modern times, many workshops will buy in rolls of pre-made wire for use in the workshop.
However, should the need arise for a piece of wire that is of an unusual diameter or shape, or if the workshop simply runs out of an existing size, which normally happens on a Saturday afternoon, it is essential to be able to make some replacement wire quickly.


First thing is to melt cast cut-off and scrap metal into a bar.
This is done in an ingot mould.
I have another free tutorial under the Tools and Tips Section on "How to make an Ingot Mold"
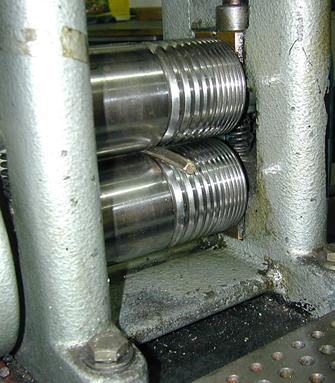

The metal is then rolled to the
appropriate thickness in the square sectioning of the roller.


I have rolled this wire carefully down to 2.5mm square out of my roller.
I want to make myself a few lenghts of
different diameter wire for stock.
Here I am annealing gold wire after
rolling also shown in this video clip.
I'm using the torch in a circular motion, so that I heat the coil of wire evenly.


What I do is I roll the first 30mm of the
wire down to a point, especially when it is still a bit thicker.
It is of course also possible to file it
down if there is no roller and the stock
has been purchased from a supplier.


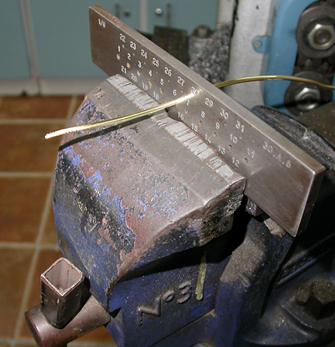
Here I am using drawing tongs after
lubricating the wire with a light machine oil or beeswax.
I start by pushing the tapered point
through the draw plate hole.
The wire is then pulled through the
consecutively smaller holes.
These holes will change in diameter in
increments of about 1/10th of a mm.
As the wire is drawn through, and
because the metal is being deformed in
it's cold state, it will become harder and harder and will have to be annealed from time to time.
On average about four to six holes and
then anneal.
If the wire is not annealed, it will snap
or crack.

For instance, 18kt gold as shown here
does not need as much annealing as
say, 14kt, or 10kt gold.
The rule of the thumb is that the less
pure the metal ( meaning more alloyed) the more annealing will be needed.
Therefore sterling silver, for instance,
will go quite a way before annealing is
needed.
10kt gold, however will work harden
much quicker.


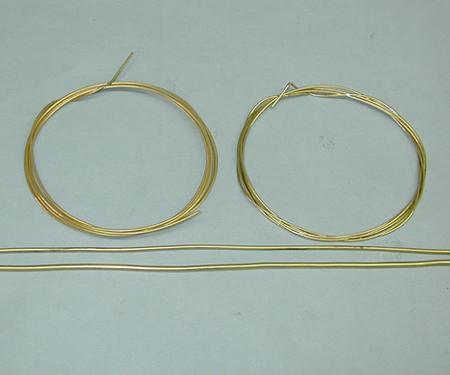
Here is the finished result of a set of
18kt gold wire for the workshop.
The bottom is 2mm wire, then 1.5mm
wire. The left coil is 1mm wire and the
right hand coil is .7mm wire.
These are the most common
thicknesses that are needed in an
average workshop.


Draw Plates -
There are many different types of draw
plates.
The two shown here are made out of HSS ( high speed steel) or tool steel.


A different round type of draw plate is
one that has tungsten carbide inserts in
it.


Tungsten carbide is a compound made
out of carbon and tungsten.
It is formed into the correct diameter
dies and then inserted into the steel
draw plate.
This draw plate is more expensive than
a steel one but is able to draw materials much harder than gold, like titanium or steel.
It gives a superior finish and lasts a
very long time.
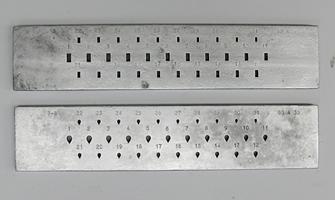

Wire, by definition, need not be round.
As the draw plates illustrate,
metal can be drawn to virtually any
shape, including hollow covered in
my tutorial on how to make tubing.
Common shapes, other than the two
shown, include oval, hexagonal, square,
triangular and star.
The most common used shapes are
round and square though.


Drawing Wire Troubleshooting -
Making wire does not come without
problems.
Most are easily solved, however.
The most common, without a doubt, is
over rolling.
In this picture I have exaggerated the
process, but what has happened is that
the rolling mill has been tightened down
too far.
This results in the metal "spreading"
out of the confines of the square
groove.


In this picture I have greatly exaggerated the process of over rolling.


If one continues to roll the wire then
the 'flashing' will fold over and back
into the main body of the wire.

Should the wire then be drawn through
a draw plate the result (somewhat
exaggerated) will look like this picture.
The wire then is unusable and will have
to be discarded.
The right way is to be patient and roll
the wire through the rolling mill with
only small reductions.
That is faster than having to melt it all
down and start again.


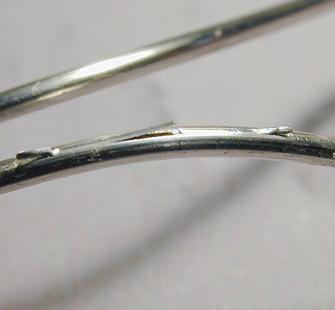
This wire has been under annealled.
Another problem with drawing wire, although not so common as over rolling, is under annealing.
This will cause the wire to snap or split.
If this action happens when the wire has been annealed, then the problem can be that the metal is contaminated. However, by the time that all the rolling has been done, contamination of the metal will have become apparent.
Another difficulty, although not a problem as such, is the drawing of very thin wire. When wire goes beyond .5mm annealing becomes most important. It is also then that the quality of the draw plate comes to the fore. The filing of the taper must be done carefully too.
Standard drawing tongs cannot be used. Rather parallel jaw pliers should be used.
You can also download the PDF version of this free tutorial on how to make your own wire.
or select other projects from Jewelry Making Tutorials List
If you have any questions or wish to be notified of any new tutorials that are posted, email me.

This content is the intellectual property of Hans Meevis. More information on our Copyright and Privacy Policy


