Online Jewelry Training Classes for Metalsmiths


Some jewelry designs call for square angular shapes that are then curved into the desired design. At the same time these designs need to be light requiriing the square to be hollow.
The problem with square tubing which is not supported on the inside, will deform when bent into a curve. Also when the tubing is being drawn down in a square drawplate, the inside does not remain square.
The method below demonstrates how to prevent that, like in this curved pendant made with square tubing.
This free tutorial follows the same format as all my other free and premium tutorials. This gives you a good insight into the technical teaching methodology.
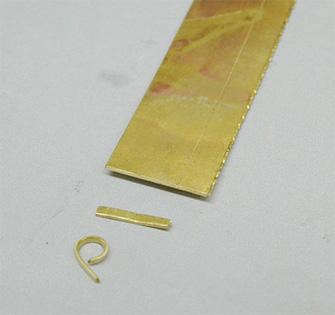
I roll the plate out, in this case 18kt gold. What I do is cut a little sliver off, then bend it round to the required circumference, snip it off and bend it straight. That gives me the approximate width that I need to cut the plate to make the tubing.

This is the tubing drawn through a round drawplate. The technique of how to make tubing is explained in more detail.

Then I insert some round copper wire into the tubing.

Then I draw the wire-tubing combo down until they become tight. In this case the tubing was 3mm and it then was drawn down to 2.5mm. An extreme example of this can be found here under Composite Metals

Then I pre-roll the tubing in my roller, to make it semi-square. I am careful to keep the seam on one flat face. That way if I do file it open later, the other sides will have no join. It is not essential though, as the following shape of the pendant will show.

Now I have drawn the tubing through my square draw plate.

This is a cross section of the tubing with the copper inside. The diameter is about 2.2mm.

Now this is the strength of this technique. Namely, it is very difficult to bend square tubing in tight curves. But with the copper inside to support the side walls, this becomes easy and clean and neat bends are possible. I also solder the ends closed at this point.

Here is another view from a different angle.

This design calls for elephant hair to be inserted into the tubing and for small diamonds to be pavéd into the unfiled sections (As a side note, the elephant hair is from the 'bottlebrush' of the elephant tail and it picked up around the waterholes in the Chobe Game Reserve when we lived there) So I use a needle files and sanding disks to expose the copper inside. It is all a bit rough at this stage, but no matter. The final finishing will come when the copper is etched out.

Into the Jett Set for setting. It is far easier to set the diamonds at this stage, rather that when the piece is hollow.

The diamonds are set. Now the piece is placed into Nitric acid. I use nitric acid, because it takes about two hours for the copper to be eaten out. However nitric is nasty stuff, and a more benign mordant is ferric chloride. It will take much longer, but is not dangerous. The printed circuit makers use it.
Note: This technique can only be done in gold.

Here the acid has etched out the copper, leaving space for the inlay to be inserted. This could also be small gemstones, enamel, resin, stone or wood. That is up to the design.

The finished pendant. The size is 30mm and it weighed 3 grams.

For this bracelet the method is that the tubing is round wilth all-round gold walls. Copper was inserted. The links were bent into the shape and hammer texture added before the copper was etched out. Then the links were soldered closed and finished with a Fold-Over Clasp

Here is an example of separate pieces soldered together to make a pendant.

A circle. This makes getting parallel sides much easier than to make it out of three pieces.
This is a handy technique in forming currves with square tubing. It has many design possibilities such as hollow earrings, bracelets and brooches. This is a good method for creating an inlay casing.
However bear in mind that this method can only work with 18k and 14k gold.
This is where you will find detailed information on Making Round Tubing.
or select other projects from Jewelry Making Tutorials List
If you have any questions or wish to be notified of any new tutorials that are posted, email me.

This content is the intellectual property of Hans Meevis. More information on our Copyright and Privacy Policy


