Online Jewelry Training Classes for Metalsmiths

In this tutorial I show faceted purple gold which I combined with a gem to create a composite stone.
When pure gold is mixed with aluminum in a ratio of 79% gold and 21% aluminum in a vacuum furnace the resultant product is an 18ct gold that is purple in colour. ( okay, for the purists, the ratio is higher that 18ct, since 18ct is 75%/ gold and 25% alloy, but to all intents and purposes you can sell it as 18ct gold.)
It is, however, not malleable, and is known as an 'inter metallic compound' So if you want to use it in jewelry, it basically has to be carved like a stone. And set like one. Also, you can not solder it , nor can you roll it in your rolling mill. It is possible to saw it with a jewelrs saw, or to file it, to give you an idea of the hardness. It can also be sanded with a buff stick, and polished in the normal manner that jewelry is polished. And here in lies the rub. Because is is so brittle, it can also be faceted too.
Sooo, I cut this piece of purple gold on my Imahashi faceting machine. I dopped it as I would a standard stone and first cut on a 260 Crystalite lap. Then to a 1200 lap and I polished on a Batt lap with 50,000 diamond powder. The material is a bit porous, but it gives a nice 'chrome' like polish. I am going to use this in a pendant, since this material is unsuitable for ring wear.
So then I got to thinking whether it would not be possible to make a composite gemstone with real stone and purple gold. Sort of like faceted intarsia. Thus came the following experiment. Firstly I took some off -cuts afghan tourmaline that I had from a previous parcel and a piece of purple gold.

And I cut and polished a face onto the tourmaline.

And then I cut an absolutely parallel piece of purple gold. I cut the first side and then used my transfer block to transfer and cut the second side. I did not polish the faces, and that appears to have been a mistake. I thought that if I left the surfaces slightly matt, there would be better grip when I glued them together. However, the glue that I used was more than strong enough and thus I lost the reflective ability of the gold. Anyway, so this is experimental stuff and so you learn as you go along!

Here are the three pieces, ready to be glued. The two tourmaline pieces are off cuts so their colors do not match. No matter...

This is the glue I use. It is (I'm told) used for glueing museum class cases together. It is UV stable, immensely strong and takes FIVE DAYS to harden. It has to measured out by weight and therefore the gemstone scale. ( quite appropriate, I think :) The bottles pictured and is available at HisGlassworks

Here are the three pieces aligned and being glued. I used a small 'G' clamp to hold them together. Not much pressure, because you don't want any distortion. I also put some masking tape onto the faces so as not to glue the whole nightmare together. So now you wait for 5 days.

And after five days these are the mated pieces.

This is the piece preformed, prior to cutting. It is now dopped in the usual manner that gemstones are attached onto their dops and faceted in the usual manner.

However, this is the stone being transferred for cutting the crown after the pavilion has been cut and polished. So before I get to the final picture, a few notes on the actual cutting and polishing.
Purple gold makes your machine dirty! It is like a dye, and gets in everywhere.
The composite stone was cut using 260,1200 Crystalite, 3000 copper, and 50,000 Batt
I thought that the purple gold would give trouble with the polishing, because essentially you are polishing stone/gold/stone on a metal lap. So I thought that the gold would cause scratches on the trailing edges of the stone. This did happen, but not to the extent that I thought it would. They were more like cats whiskers, and a change in rotational angle solved the problem every time. Essentially I got a polish that was as good as if the gold had not been there.

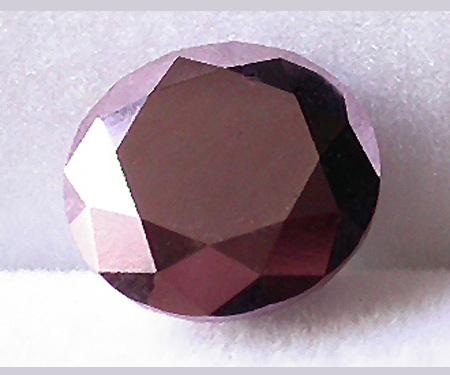
Here is a picture of the finished stone. You can see that the two tourmaline pieces are not of equal colour. Also on the right side there are cracks that formed, and they did so whilst polishing the table. That happened to be the last facet ------and is perfectly in tune with the " First Law of Gem Cutting", which says that the biggest problem always happens on the last facet.... ........Moderate sigh...

When the mating surfaces of the composite stone are cut with precision, the glue component of the division is negligible, in terms of polish.
The following picture is taken at 45 X magnification. Apart from the purple gold grain structure the joint is very small, and under a 10X loupe is virtually invisible.

One of the first attempts of mine was to glue together a piece of peridot and garnet and then facet them. From the glue aspect it was quite successful but from the 'visual' aspect it was less so. Namely, the garnet killed the color of the peridot. At some angles is looks orange, because of the mix of the two colors and at others, red.. The 'scratches' in the picture are actually inclusions in the stone. I do not experiment with top grade material.
or select other projects from Jewelry Making Tutorials List
If you have any questions or wish to be notified of any new tutorials that are posted, email me.
This content is the intellectual property of Hans Meevis. More information on our Copyright and Privacy Policy


