Online Jewelry Training Classes for Metalsmiths

In this step by step instruction the spin casting of jewelry also referred to as centrifugal casting process, is explained. This method is commonly used for mass production or casting unique one-of-a-kind pieces. It is also known as the lost wax method.
This method of casting has been done for more than 5000 years. The ancient Egyptians, amongst others were adept at it. In those times, beeswax and clay and charcoal fires were used. Still, the principle remains the same.
This free tutorial follows the same format as all my other free and premium tutorials. This gives you a good insight into the technical teaching methodology.
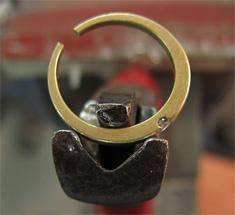
Okay, so first I carved a ring and then I sprued it up and attached it to the rubber former. The wax I am using is a new wax I am trying out for the first time. It is made by Kate Wolf. It is supposed to represent the gold colour. It carves nicely, but the colour does not show detail up as nicely as purple wax, which I normally use. The black rubber former at the bottom has a convex shape in it which will make a concave form in the plaster for the molten metal later. The wax is weighed before it is mounted in the former ( also known as a sprue base) and the amount of silver, in this case, can be worked out. Silver is 10.4 times the weight of the wax ,14ct gold is 13.4 times and 18ct gold is 17 times the weight. Also, 20% extra should be added each time to accommodate the button of the main sprue. However, as struggling artists I have quite successfully cast without the 20%.

Here the ring is in the flask the flask is in the rubber former.
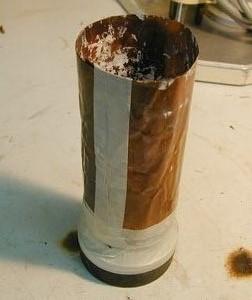
Then I put a copper surround around the flask with masking tape. This is to stop the investment (Plaster) from bubbling over the top of the flask when it is vacuumed. I use copper because it is easy, but plastic, vinyl are also suitable.

This is the powder I use. I buy it in 100lb boxes, but it is available in 5lb quantities.

I measure the plaster out accurately and at the same time I weigh out the water as well. This is normally mixed in a ratio of 40%, but I prefer 38%. The temperature of the water will determine how quickly the plaster sets. Some of my friends make their water ice cold, then mix the plaster very thick, saying it gives a better density and thus a smoother casting, but I couldn't be bothered with that. I just do it at room temperature

I use a cake mixer to mix. The glass of water is the pre-weighed water. I am only mixing 300grams of powder. Straight after mixing, the plaster is poured into the flask. It should be the consistency of thick cream.

Straight after pouring, the investment is vacuumed. Vacuuming is the best way, but the wax model can be coated with a debubbleizer, ( dishwashing liquid is also ok) then allowed to dry and the investment is then vibrated as soon as it is poured in the flask, which works so so. Some bubbles will remain. These bubbles will then be cast and if the are attached in a critical part of the piece, can be a real pain to remove. I just vacuum the piece for about 90 seconds. In the picture, I am using the vacuum side of a vacuum casting machine. I don't like vacuum casting, but others do.
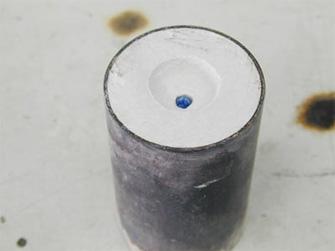
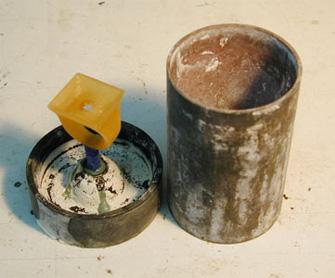
Once the plaster has set the rubber former is pulled off. You can see the indentation in the plaster that will collect the molten metal. The blue is the sprue wax. This will be burnt out in the burn-out oven

Then the flask is put in the oven. Normally I would have several flasks but in this case I want to cast in 3 hours time. The oven is heated up slowly. First at 200C until the wax is melted out and the flask is dry. About 1 hour. Then to 500C for half an hour, then 700C for an hour then back to 500C for half an hour. That is the temperature I like casting at, generally. With many flasks, this time increases to up to 12 hours. It all depends on how many flasks there are. The flask has to be white in colour when it is ready to be cast . This means that all the wax has been burnt out and any carbon residue left from the wax has been turned into carbon-di-oxide, which is the purpose of this oven.
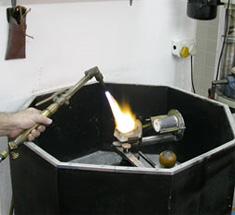
This is a basic 'broken arm' spin casting machine. It is wound up with a spring. This is a cheepo model, but it works just fine for me. I just built the box out of wood and it has never given me trouble. I can cast articles up to 500 grams with it.
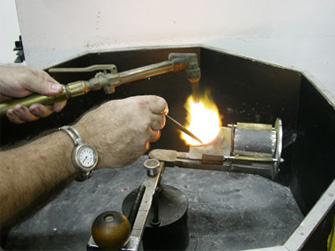
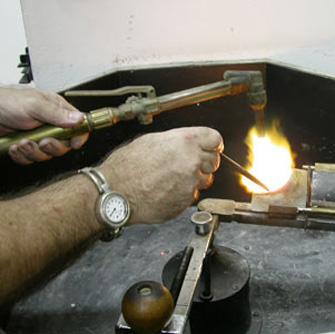
Then the crucible is slid up to the flask and the metal is 'super heated'. This is about 100C above it's flow point. This is to allow the metal to remain in a molten state as it enters the mold. The metal enters the mould under tremendous force, sometimes up to 50 times the force of gravity. It depends on how strongly the arm is wound up. I choose the middle road. No need to kill something by excessive force.

Action! Note the splash of metal in the bottom of the box. This is because 'ol bright eyes here forgot to weigh the ring before I invested it. So I put in more that I needed, which is much preferable to to little, believe me. Lucky this time, since I am casting silver ....
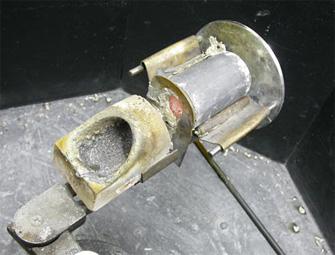
Once the machine has stopped spinning and the button is not red anymore in normal light, the flask is dumped in a bucket of water. This causes the investment to disintegrate and the (hopefully) complete piece is removed.

Like this . This ring was cast because it is difficult to make by any other method. Not impossible, but difficult.
I always keep in mind that when I work in a medium. I stay true to that medium. What I mean is this. There is no point to cast one-off plain wedding bands. They can be made far easier by other methods. By the same token, this ring is far easier to make in wax than fabrication or forging. This ring will be smoothed and thinned out and the a mould will be made of it. The resultant models will be made to accept different tops with different stones set in those tops.
This is the basic methodology of spin casting. There are many variations of this method.
or select other projects from Jewelry Making Tutorials List
If you have any questions or wish to be notified of any new tutorials that are posted, email me.

This content is the intellectual property of Hans Meevis. More information on our Copyright and Privacy Policy